Public Way Permit Application Instructions

  • Review City Ordinance Chapter 14.32.
  • Obtain applicable agency or City department permits.
  • Submit bond and insurance documents for approval.
    • Company name for licensed contractor, bond and insurance must match.
  • Apply for Public Way Permit.
    • Pay assessed fees.
  • Contact Engineering Inspector 24 hours prior to starting work.
    • Assigned inspector is listed on the issued permit.

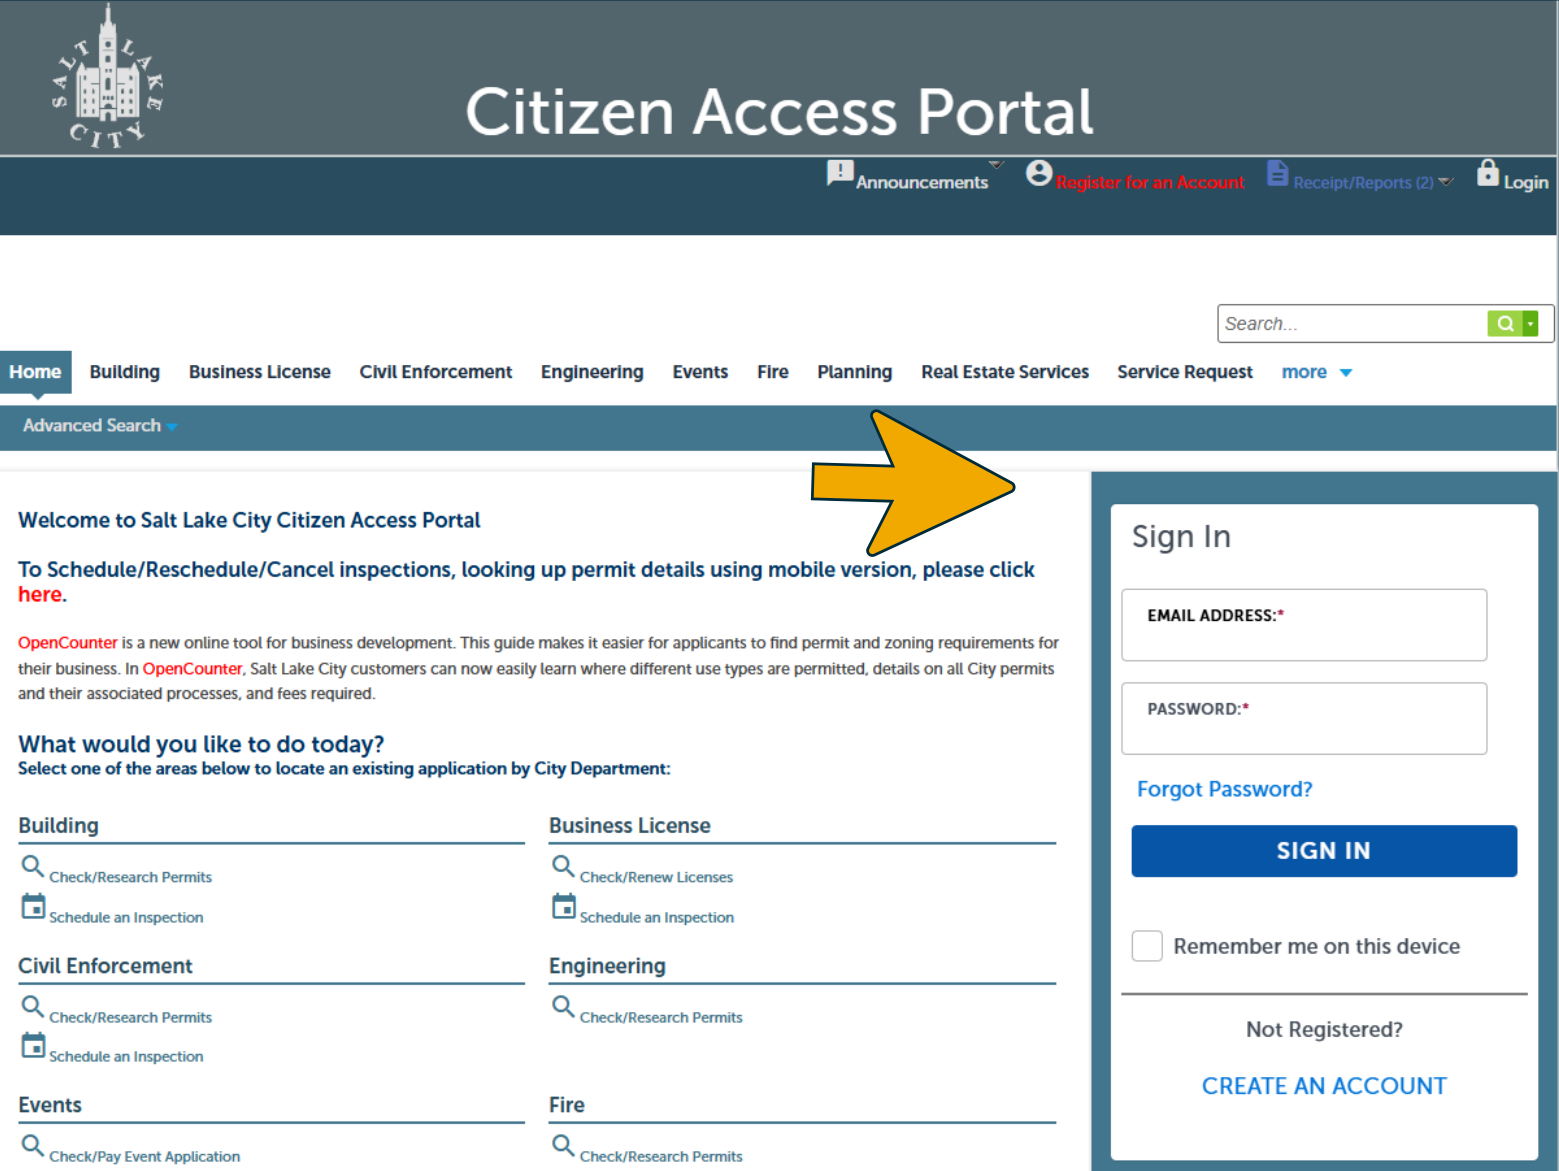
1. Login or register for an account on the Citizen Access Portal. Allow pop-ups.

Citizen Access Portal home screen with an arrow pointing to the Sign In and account registration form

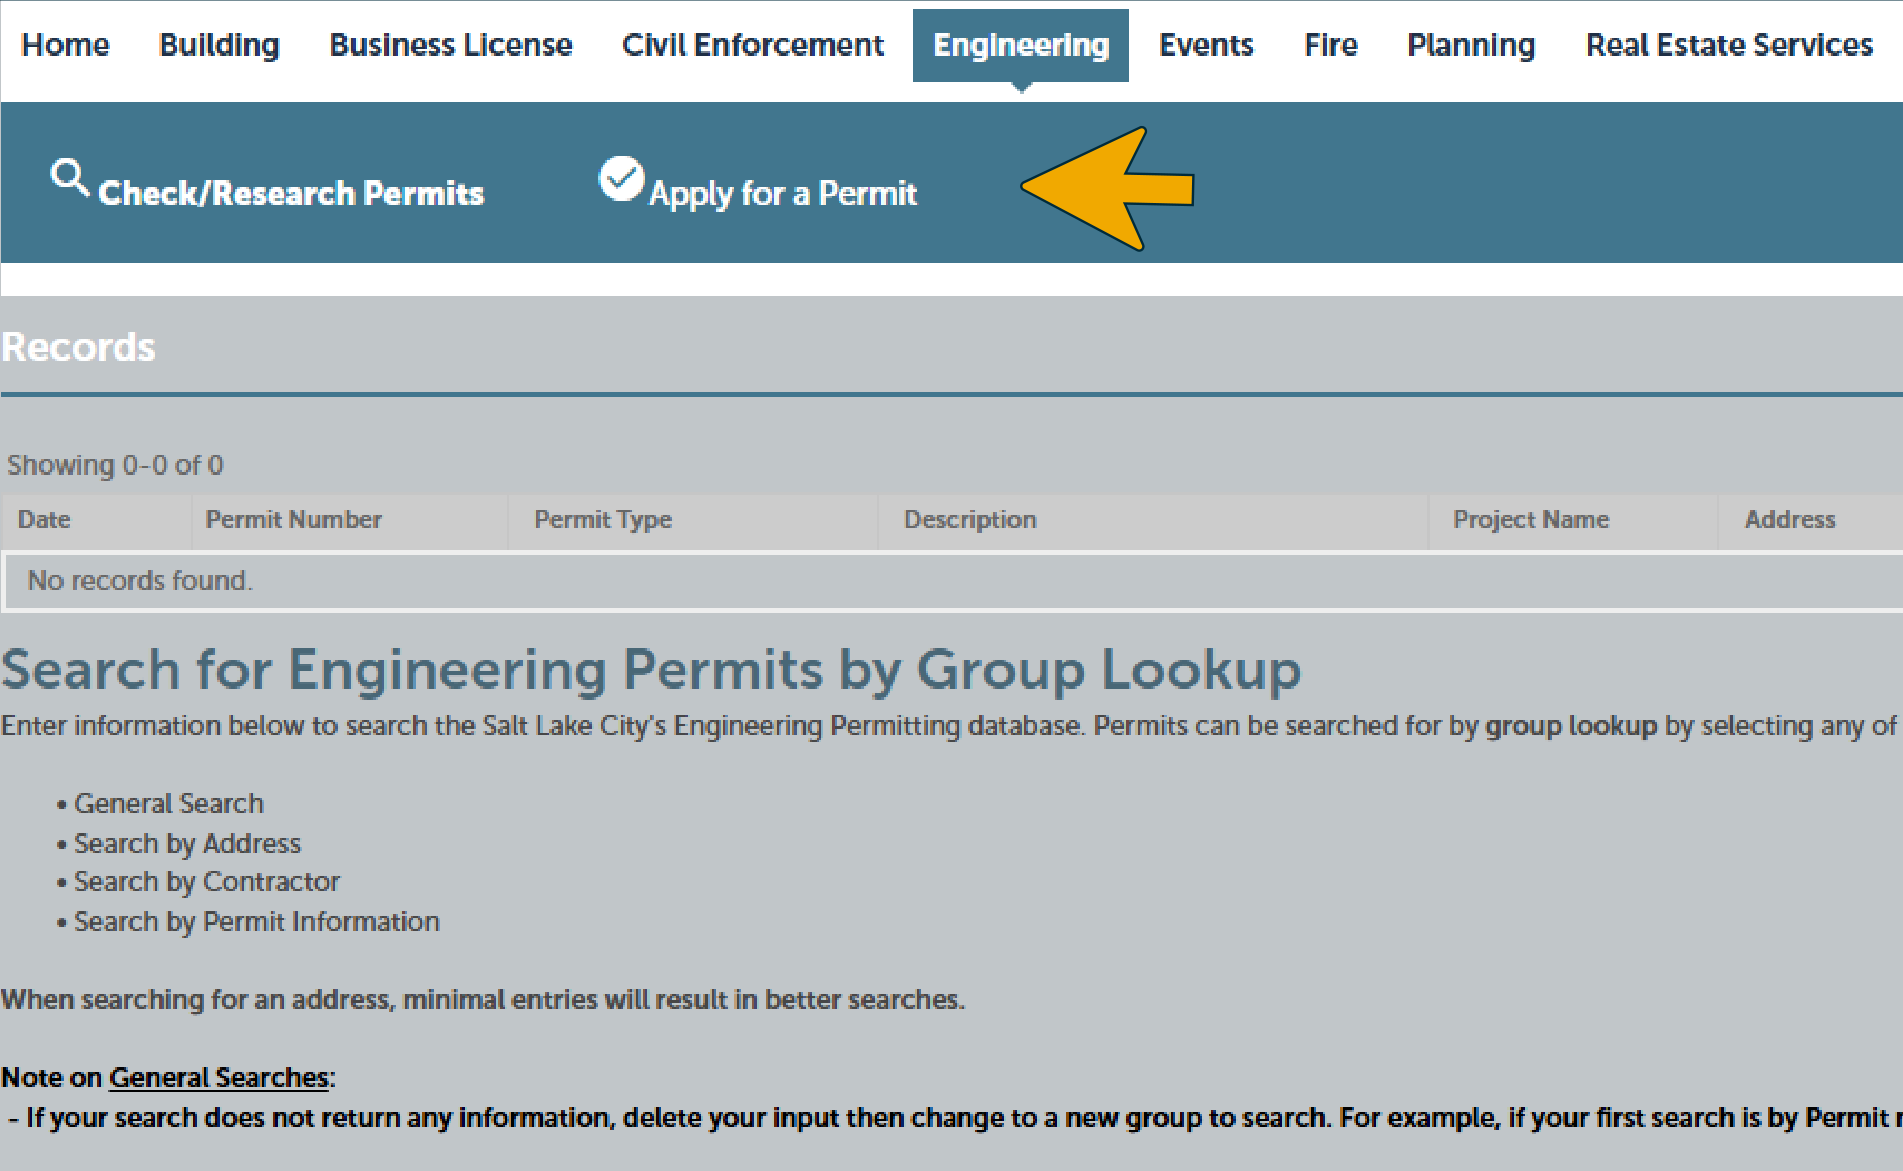
2. Apply for a public way permit under the Engineering tab. You will only have the option to apply if you are logged in.

Portal navigation showing the Engineering tab selected with an arrow pointing to the Apply for a Permit action

3. Read and agree to terms.
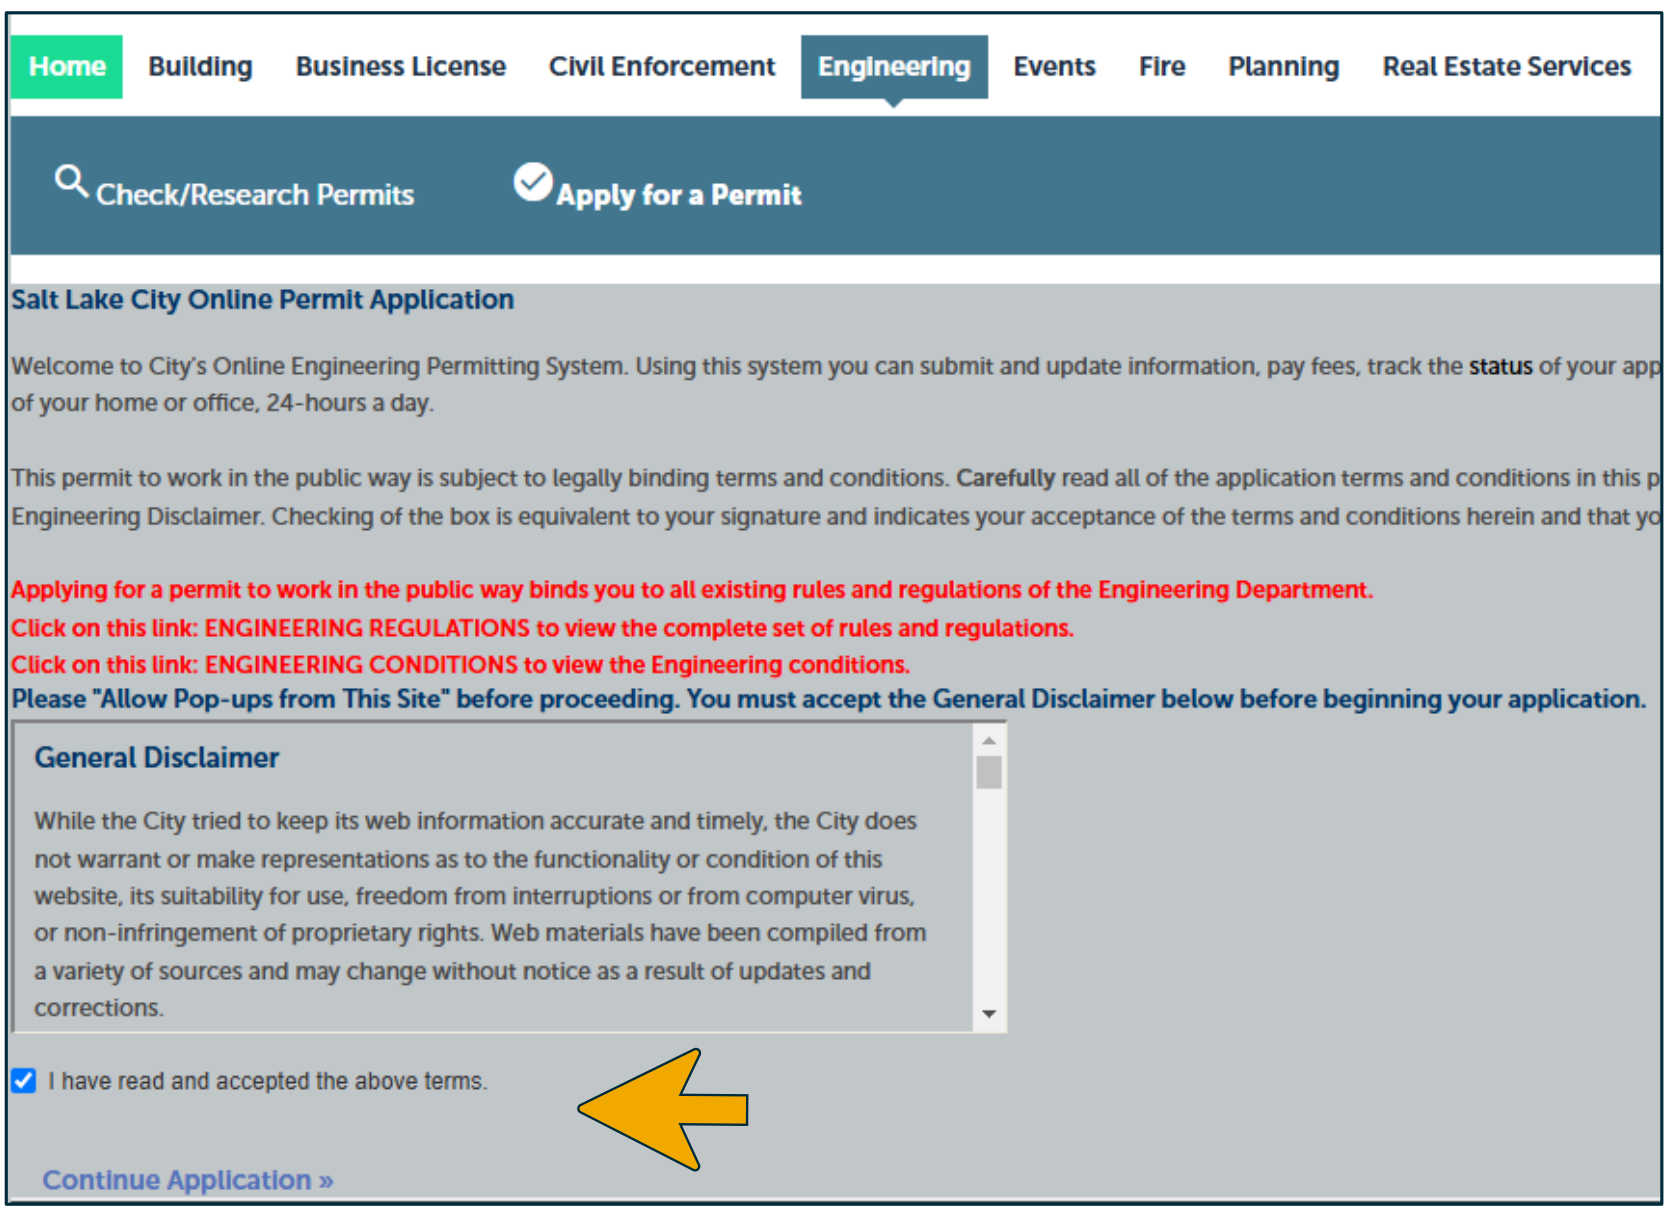
Salt Lake City Online Permit Application - General Disclaimer agreement screen with arrow pointing to checkbox 'I have read and accepted the above terms.'
Accessible view

General Disclaimer agreement screen. A disclaimer appears in a scrollable text area.

The screenshot shows a checked checkbox labeled I have read and accepted the above terms. A yellow arrow points to this checkbox. The Continue Application » link appears below it.

4. Search the work location.

Enter the house number and street name without any suffixes (St, Ave, N, S, E, W). Leave all other fields blank and click Search. A menu should appear with a few addresses to pick from, or the parcel information will automatically fill below. Find a Certified Address and confirm the property is in Salt Lake City.
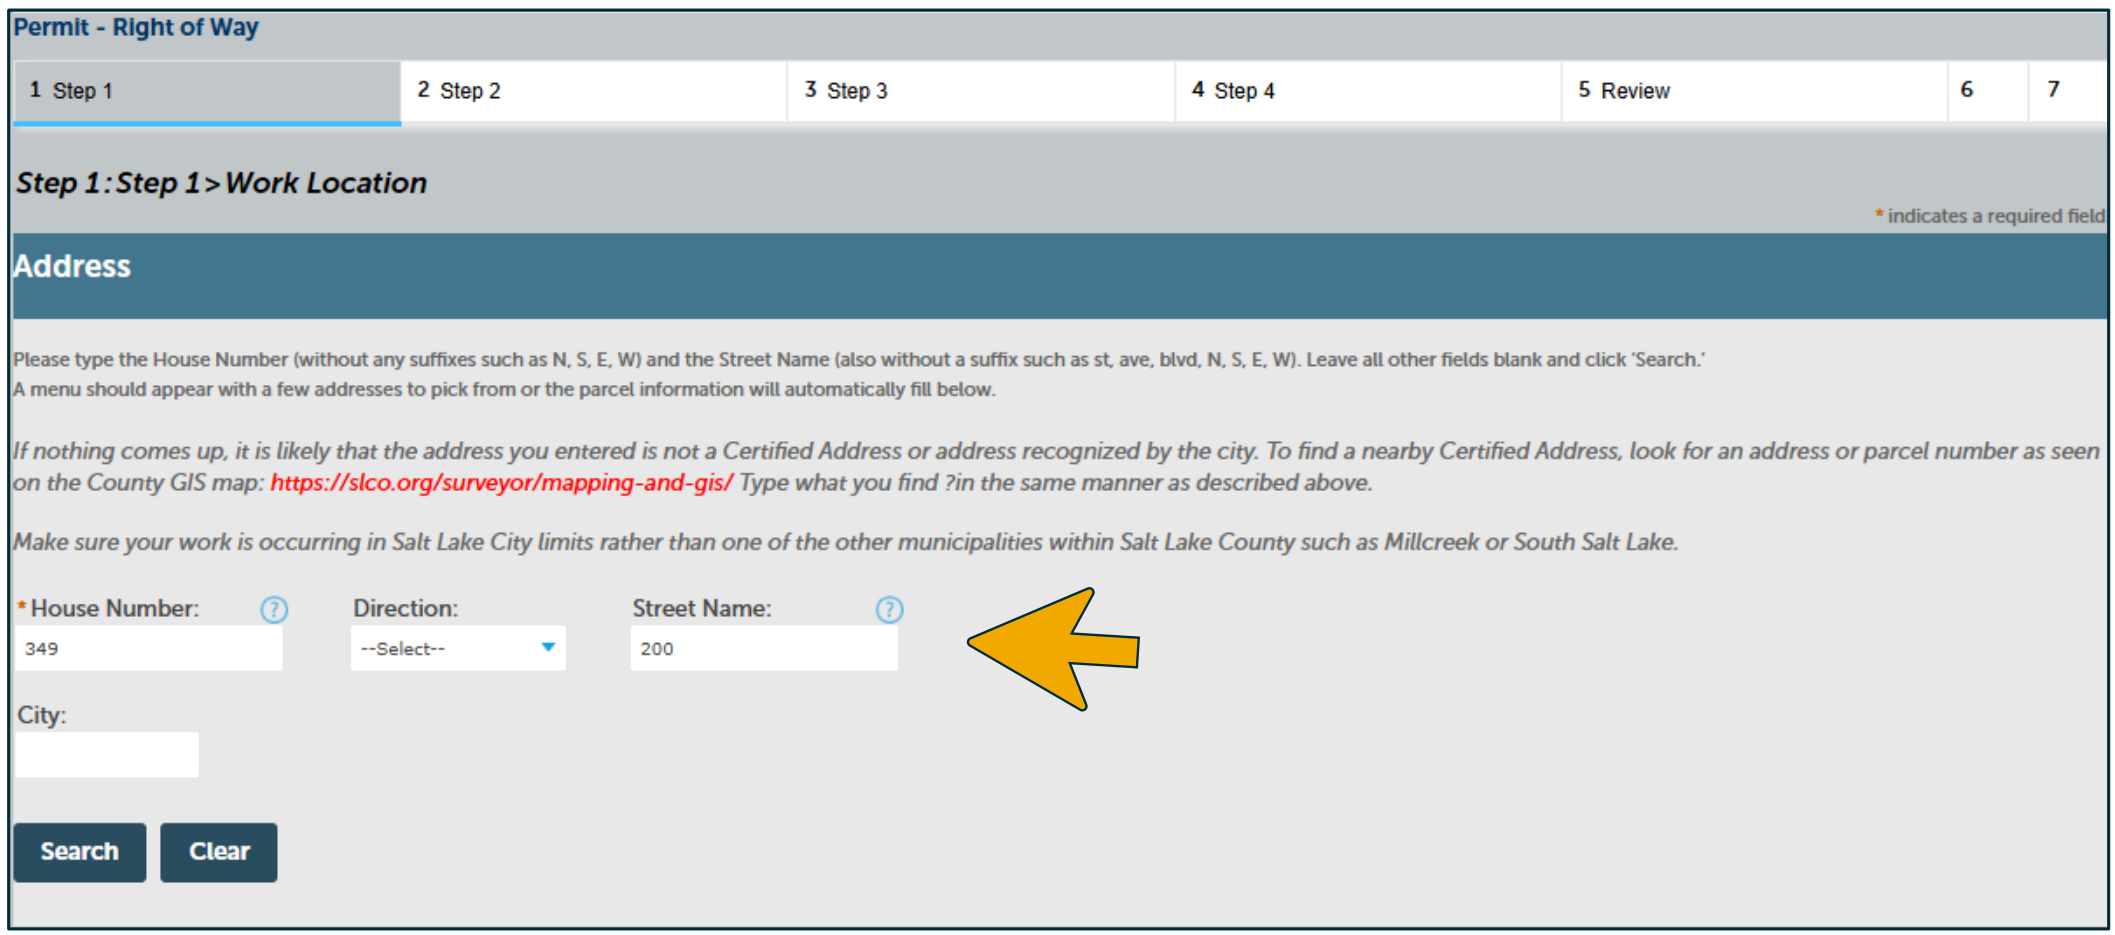
Step 1 Work Location address search form with house number and street name fields filled in, indicated with an arrow
Accessible view

Step 1: Work Location > Address. The address form contains these fields: House Number with 349, Direction with --Select--, Street Name with 200, and a blank City field.

A left-pointing yellow arrow highlights the Street Name field. The available actions are Search and Clear.

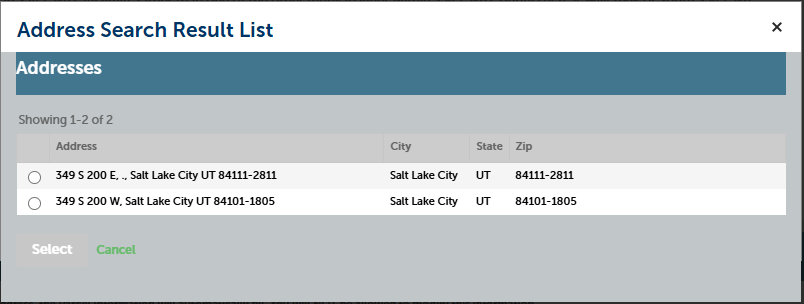
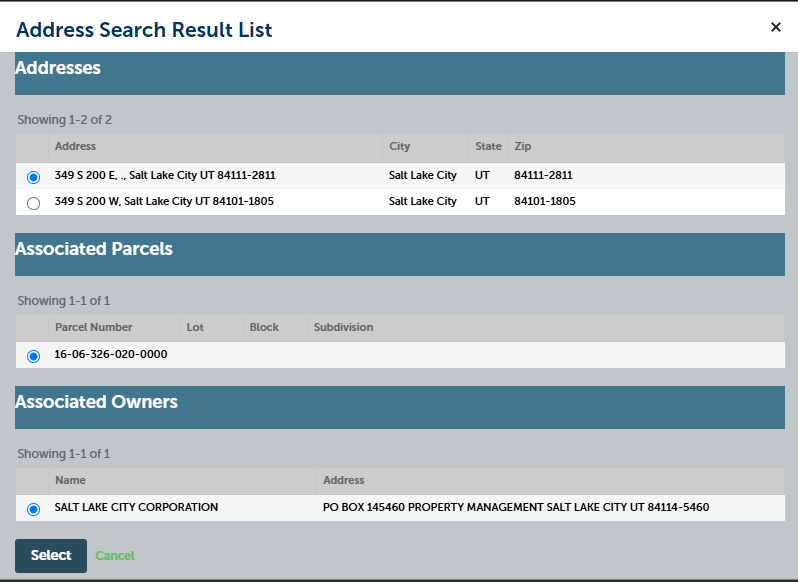
5. Select correct address from pop-up lists.

Address Search Result List pop-up showing initial matching address results for Salt Lake City
Address Search Result List modal displaying selected address, Associated Parcels, and Associated Owners with a Select button

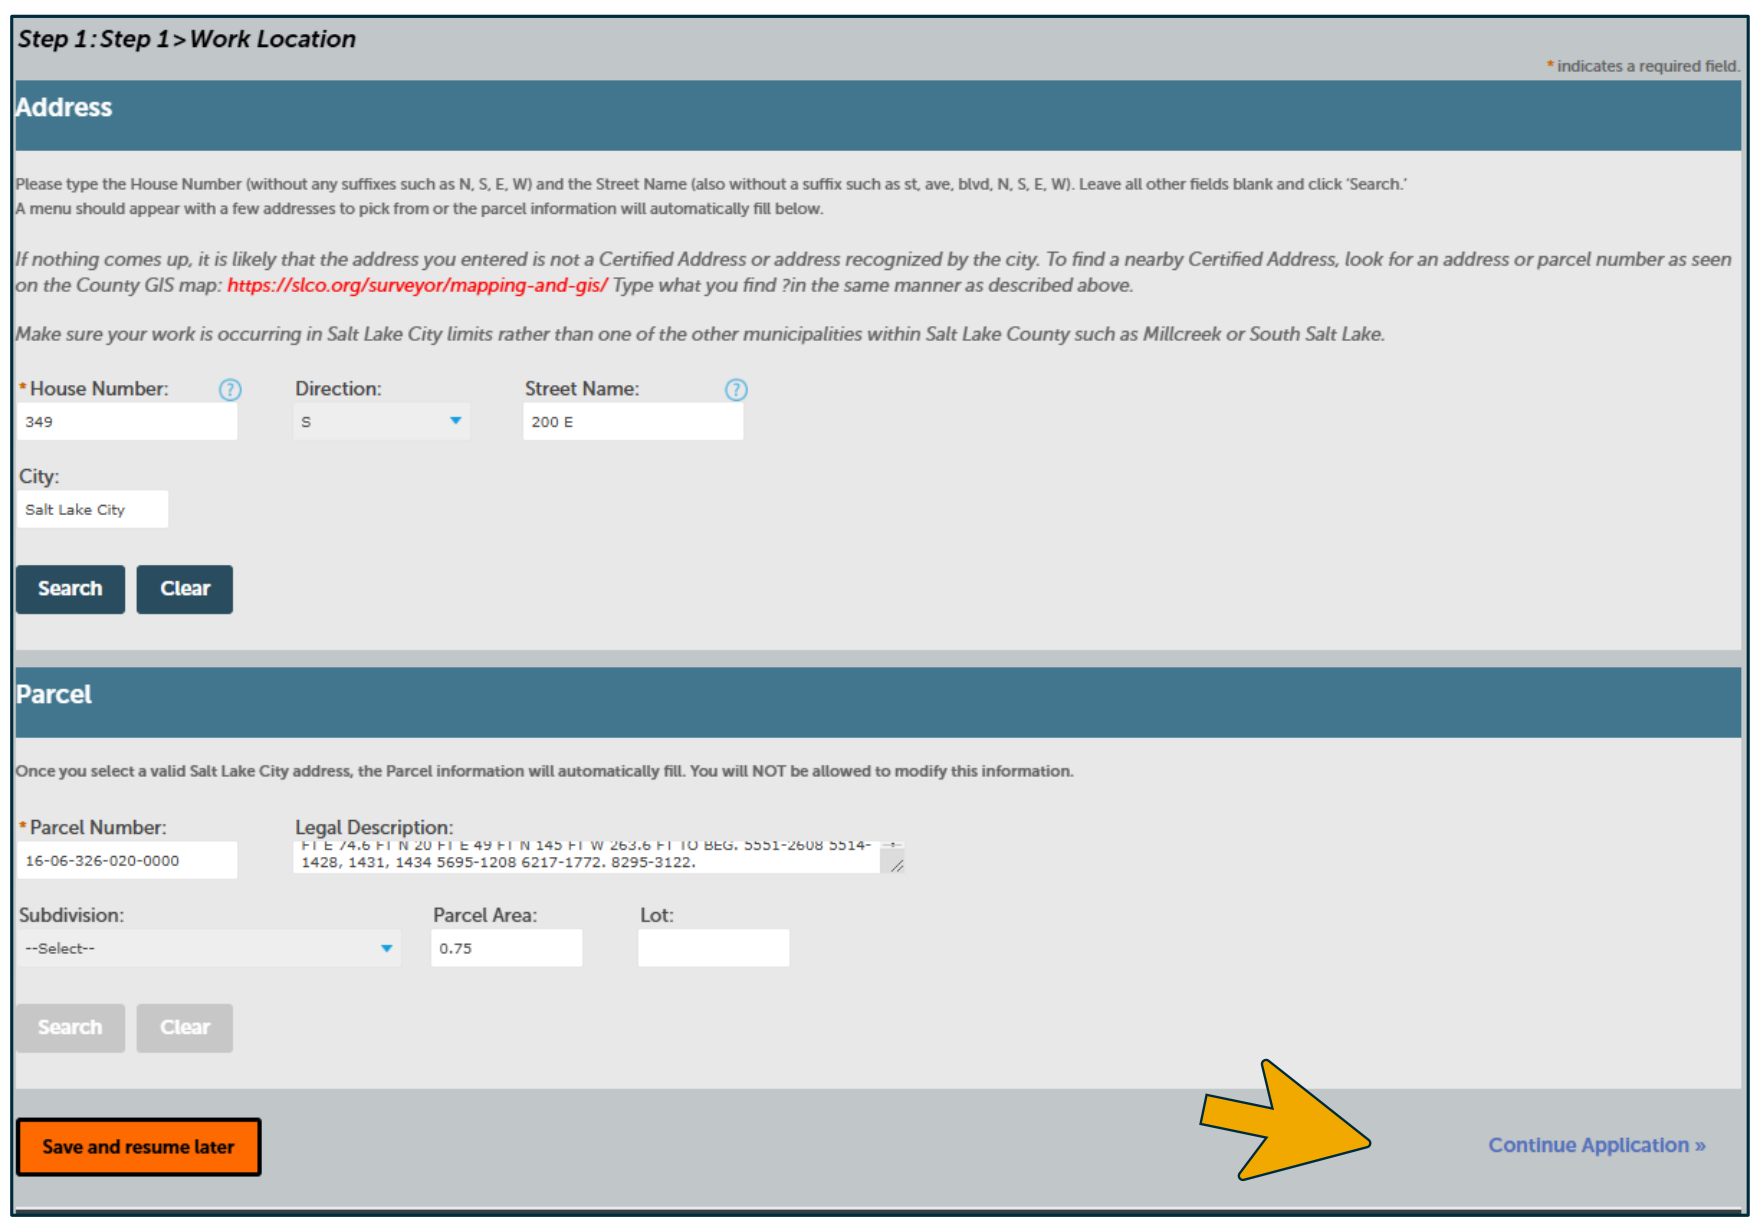
6. The address and parcel information will populate. Save or continue your application.

Work Location form populated with Address and Parcel information, indicating Save and resume later and Continue Application options
Accessible view of the instructional screenshots

Step 5, first screenshot: Address Search Result List

The Addresses results show “Showing 1-2 of 2” and two unselected address choices:

  • 349 S 200 E, , Salt Lake City UT 84111-2811
  • 349 S 200 W, Salt Lake City UT 84101-1805

The dialog has Select and Cancel controls.

Step 5, second screenshot: selected address details

The first address is selected: 349 S 200 E, , Salt Lake City UT 84111-2811. The Addresses section still shows two results. Associated Parcels shows “Showing 1-1 of 1” with parcel number 16-06-326-020-0000 selected; the Lot, Block, and Subdivision columns are present. Associated Owners shows “Showing 1-1 of 1” with SALT LAKE CITY CORPORATION selected and the address PO BOX 145460 PROPERTY MANAGEMENT SALT LAKE CITY UT 84114-5460. Select and Cancel controls appear below.

Step 6: Work Location form

The Work Location form is populated after the address and parcel selection. In Address, the visible values are House Number 349, Direction S, Street Name 200 E, and City Salt Lake City. In Parcel, the visible Parcel Number is 16-06-326-020-0000, Parcel Area is 0.75, and the Lot field is blank; a Legal Description field is also populated and Subdivision displays “--Select--”. Search and Clear controls are shown for the sections. At the bottom are Save and resume later and Continue Application ».

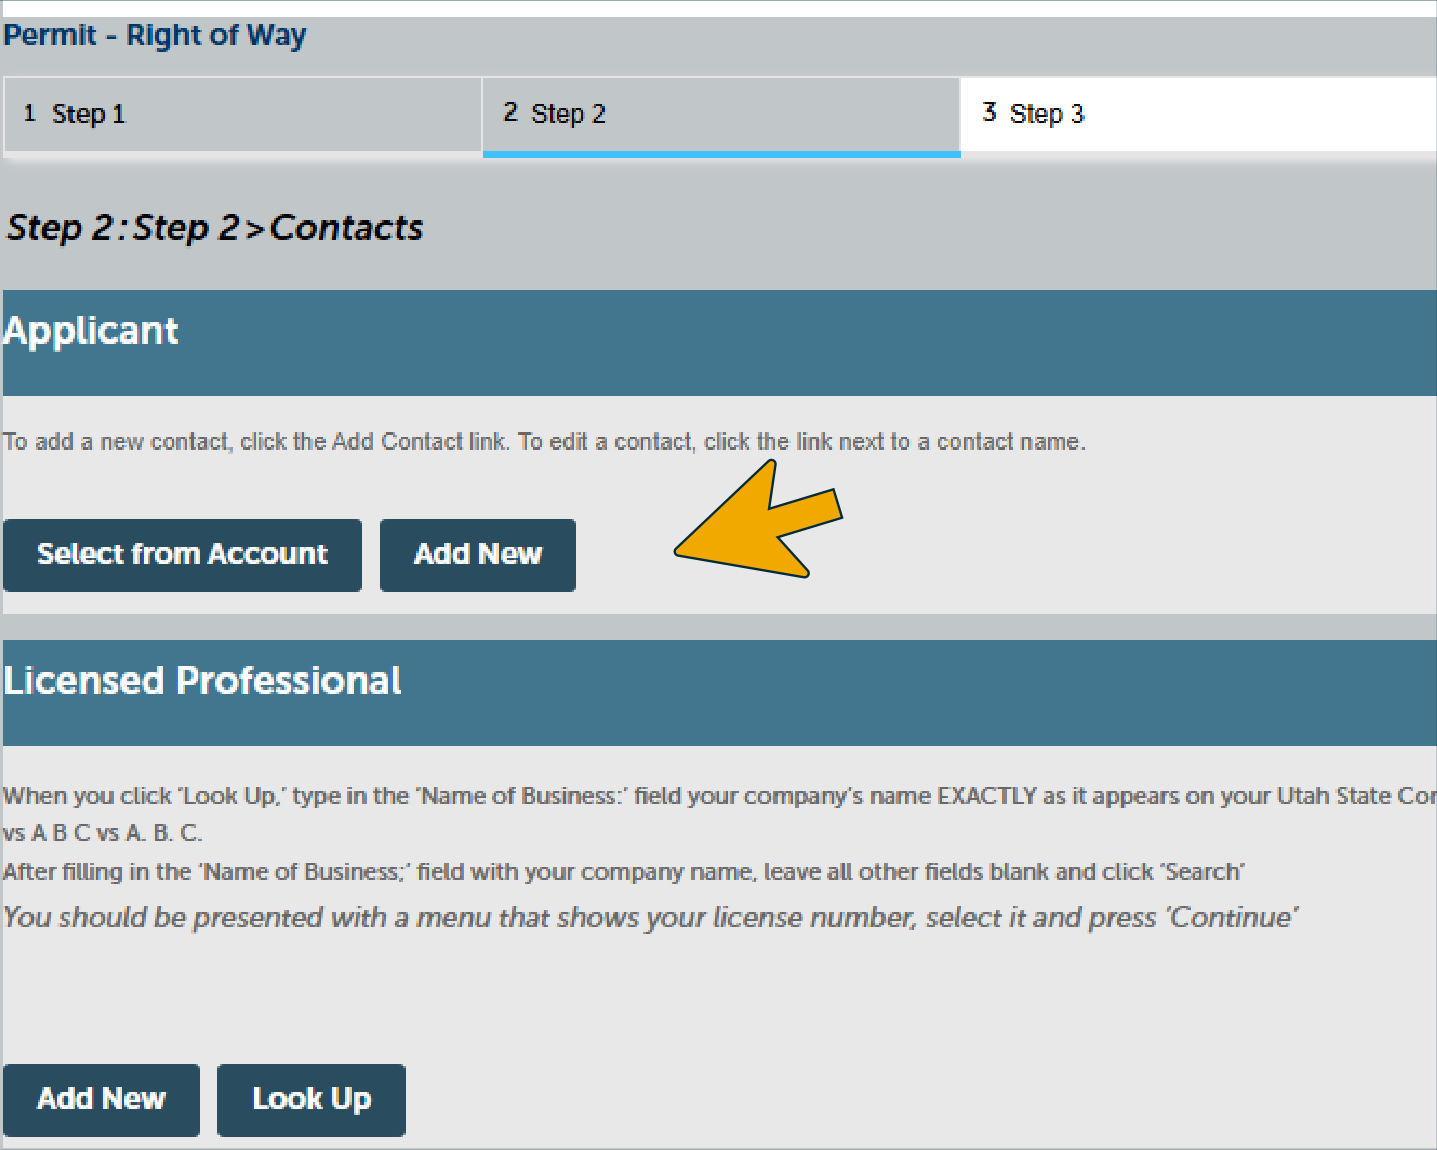
7. Add contact information for the person managing the application. The field contact will be added later.
Permit - Right of Way online portal, Step 2 Contacts: in the Applicant section, an orange arrow points to the Add New button.
Accessible view

Screenshot transcript: The online portal is on “Step 2 > Step 2 > Contacts.” The Applicant section says, “To add a new contact, click the Add Contact link. To edit a contact, click the link next to a contact name.” Its visible controls are Select from Account and Add New; the orange arrow highlights Add New. A Licensed Professional section appears below with Add New and Look Up controls.

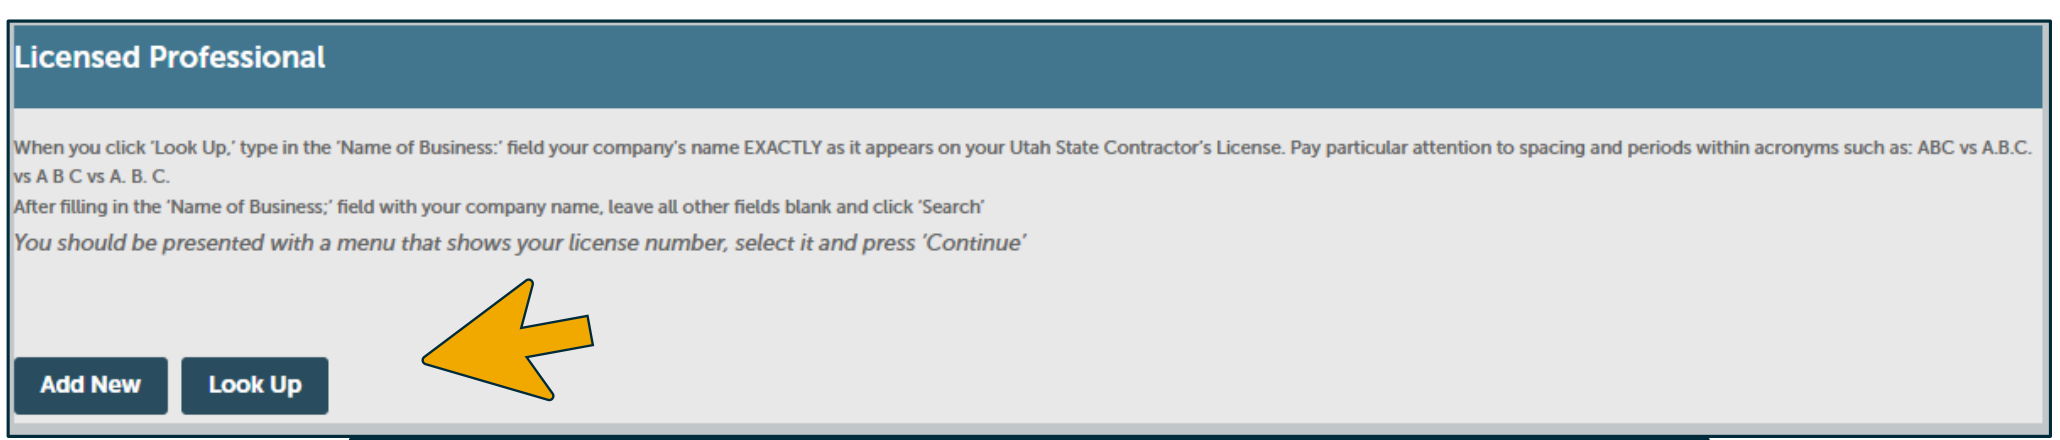
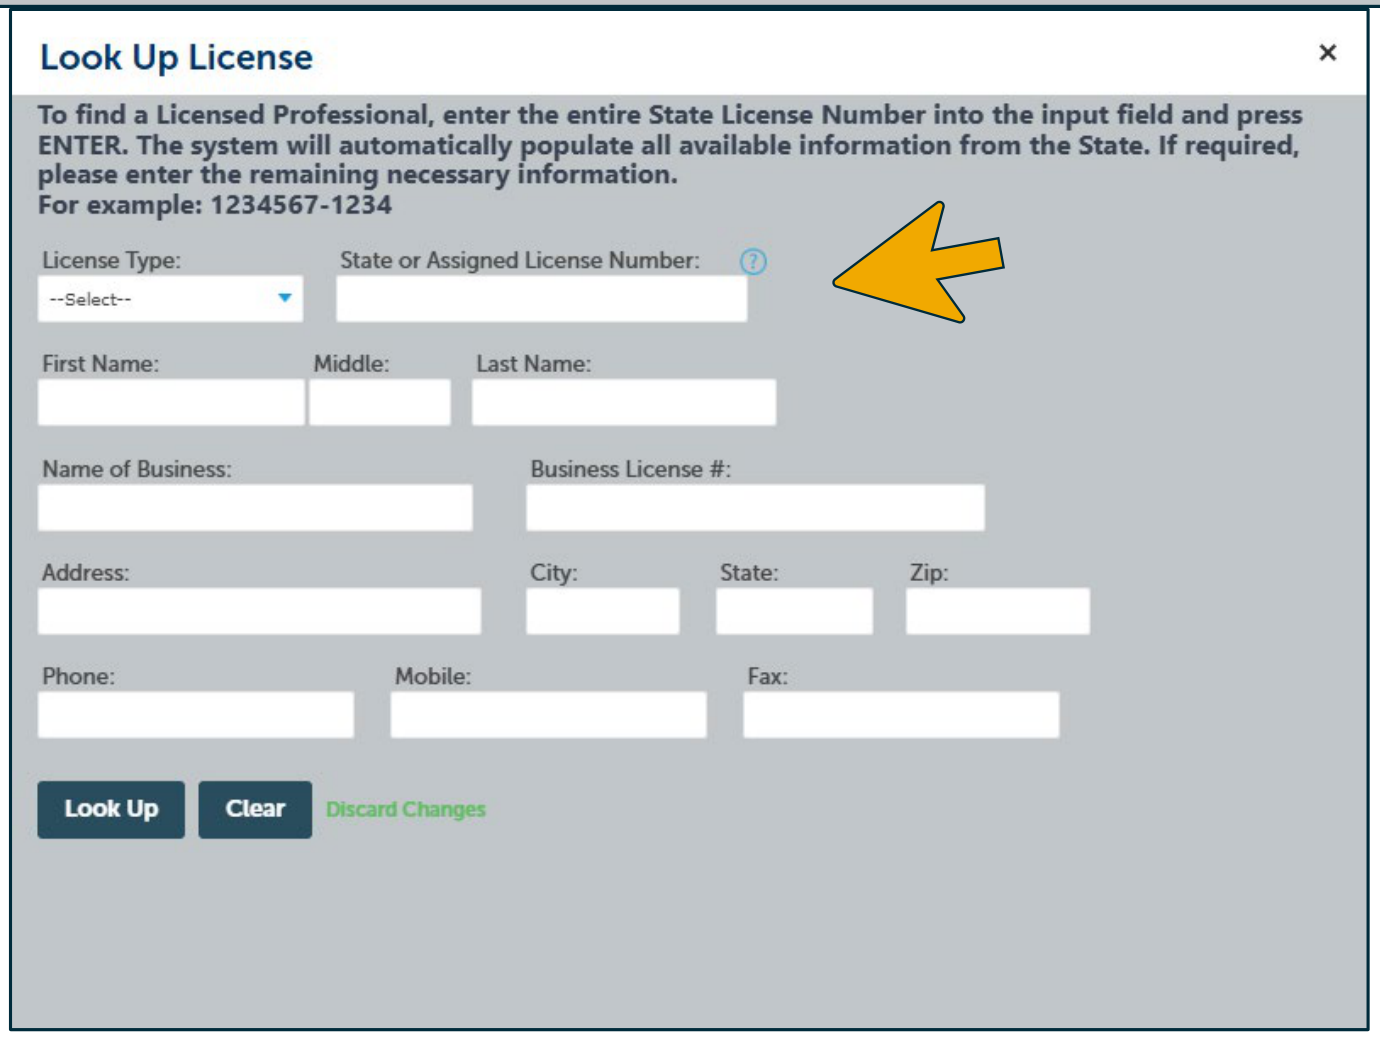
8. Select Look Up or Add New. Enter the contractor’s license number under State or Assigned License Number. If you do not have a contractor’s license number, enter “00000”.
Licensed Professional section with Add New and Look Up controls; a yellow arrow points to Look Up.
Accessible view

Screenshot transcript: The Licensed Professional section explains that after selecting Look Up, the company name is entered in the Name of Business field, then Search is selected; the displayed license number is selected and Continue is pressed. The visible controls are Add New and Look Up; the yellow arrow highlights Look Up.

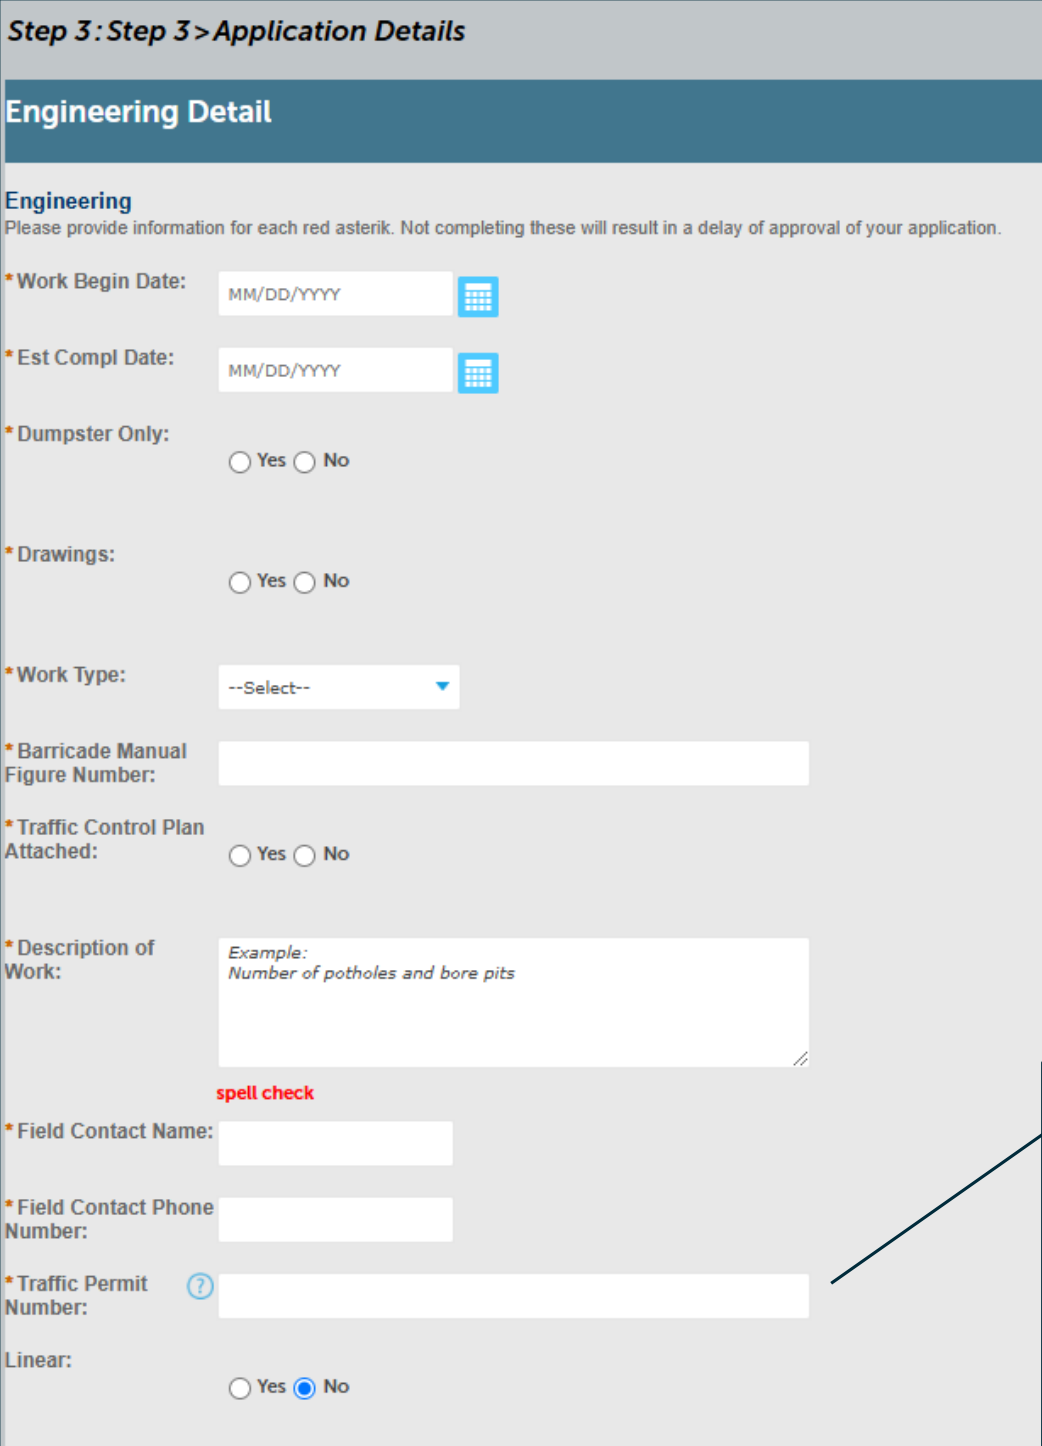
9. Enter permit information, including a description of all work in the right-of-way, and the emergency field contact.

Screenshot of Application Details - Step 3: Engineering Detail form showing fields for Work Begin Date, Estimated Completion Date, Dumpster Only, Drawings, Work Type, Barricade Manual Figure Number, Traffic Control Plan Attached, Description of Work, Field Contact Name, Field Contact Phone Number, Traffic Permit Number, and Linear options
Accessible view

Step 3: Step 3 > Application Details. Engineering Detail form for the Engineering section.

Please provide information for each red asterisk. Not completing these will result in a delay of approval of your application.

Work Begin Date
Blank date field with the placeholder MM/DD/YYYY and a calendar control.
Est Compl Date
Blank date field with the placeholder MM/DD/YYYY and a calendar control.
Dumpster Only
Yes or No.
Drawings
Yes or No.
Work Type
Selection field showing --Select--.
Barricade Manual Figure Number
Blank text field.
Traffic Control Plan Attached
Yes or No.
Description of Work
Text area showing the example: “Example: Number of potholes and bore pits”. A red “spell check” label appears below it.
Field Contact Name
Blank text field.
Field Contact Phone Number
Blank text field.
Traffic Permit Number
Blank text field with a question-mark help icon.
Linear
Yes or No, with No selected.

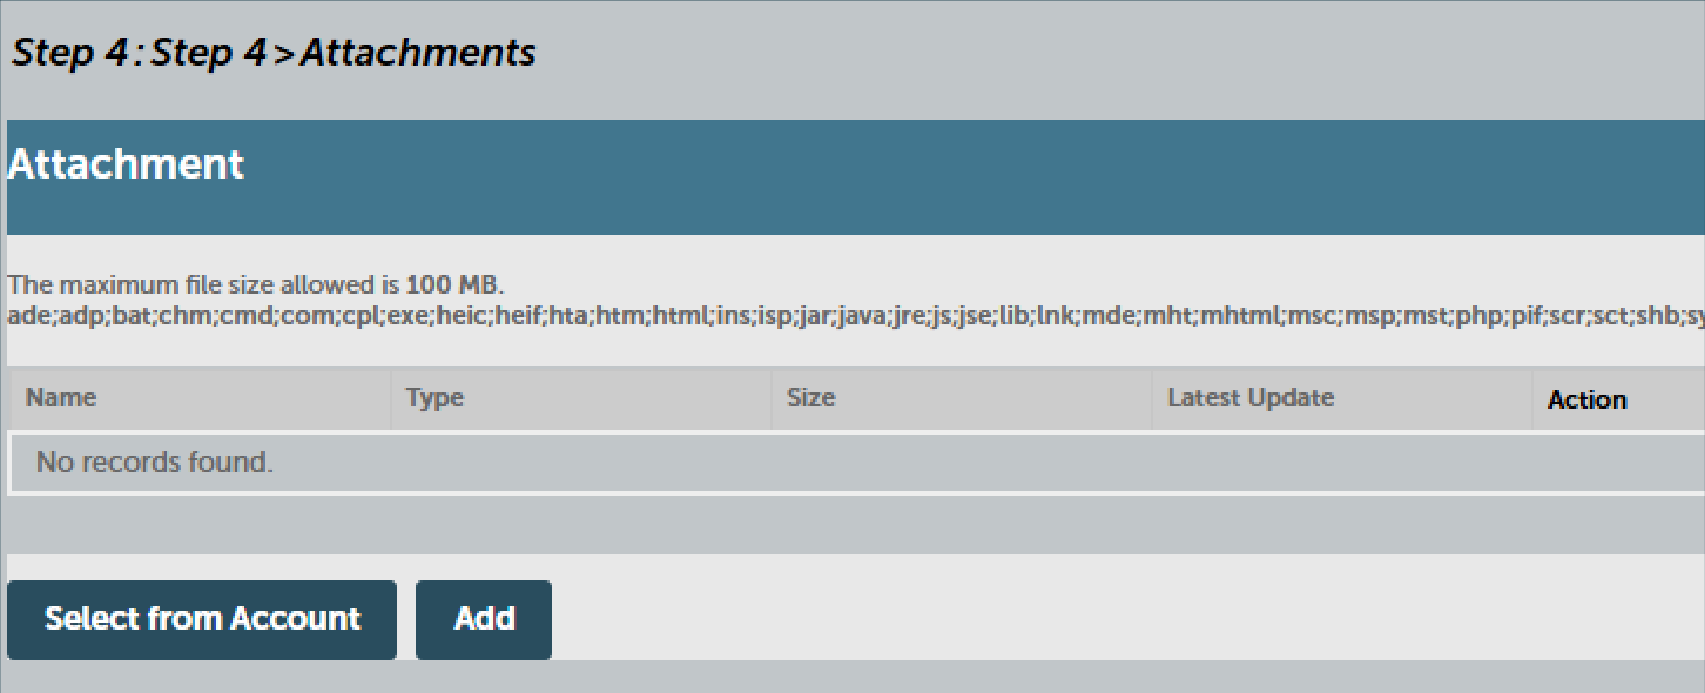
10. Add attachments, including City approved site plans, running line approval, diagrams, traffic control plan, other permits, etc.

Screenshot of Step 4: Attachments interface showing attachment list table and buttons for 'Select from Account' and 'Add'
Accessible view

Step 4: Step 4 > Attachments. The Attachment interface is shown.

The maximum file size allowed is 100 MB.

Allowed file extensions: ade, ardp, bat, chm, cmd, com, complex, ef, eml, heif, hta, htm, html, ins, ipa, jar, java, jre, jsp, js, lib, lnk, mde, mht, mhtml, mnc, msp, php, pif, scr, sct, sh, shb.

The attachment table has the columns Name, Type, Size, Latest Update, and Action. It currently says: No records found.

Available buttons: Select from Account and Add.

11. Select Checkout to submit your application. We will review your application and contact you when fees are ready to be paid.

12. The permit number is shown in red. After the permit has been paid and issued click print/view record to see your inspector’s name and number.

* Find your existing permits to check the status or pay fees.

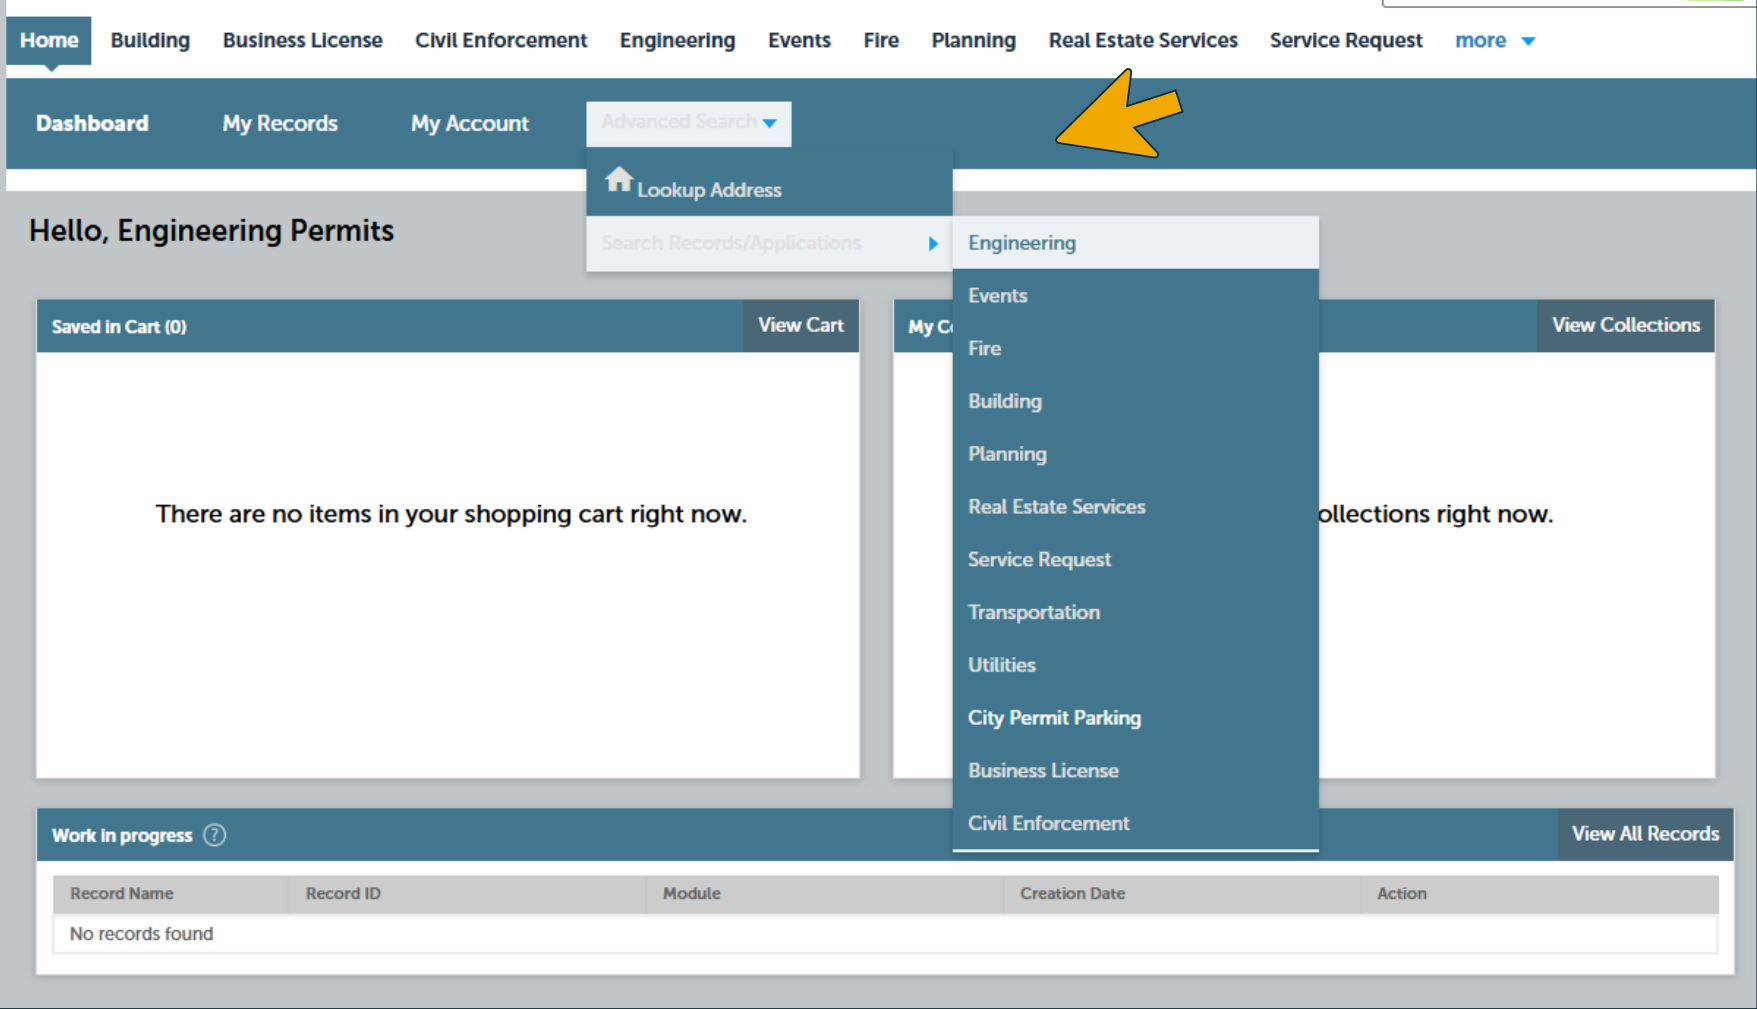
Home > Advanced Search > Search Records > Engineering

Screenshot of Citizen Access navigation menu highlighting Advanced Search and Engineering option

Navigation path shown: Home > Advanced Search > Search Records > Engineering. A yellow arrow highlights Advanced Search, and the open menu shows Engineering as the destination.

Accessible view

The Citizen Access page shows the Advanced Search menu opened from the top navigation. The Search Records/Applications menu leads to Engineering, matching the path Home > Advanced Search > Search Records > Engineering. The page underneath is the Engineering Permits page with a Work in progress section.

Permit Status

In Progress - Permit application has been received and is being review by Engineering. Permit has not been issued.

Denied - Permit application has been denied and is closed.

Revoked - Permit was issued but is now revoked due to inactivity or direction to cancel by the applicant.

Inspection - Permit has been issued and is active.

Under Warranty - The work associated with the permit has passed final inspection and is now under a 3-year warranty. After 3 years, a release inspection will automatically be scheduled by the City Engineering Division.

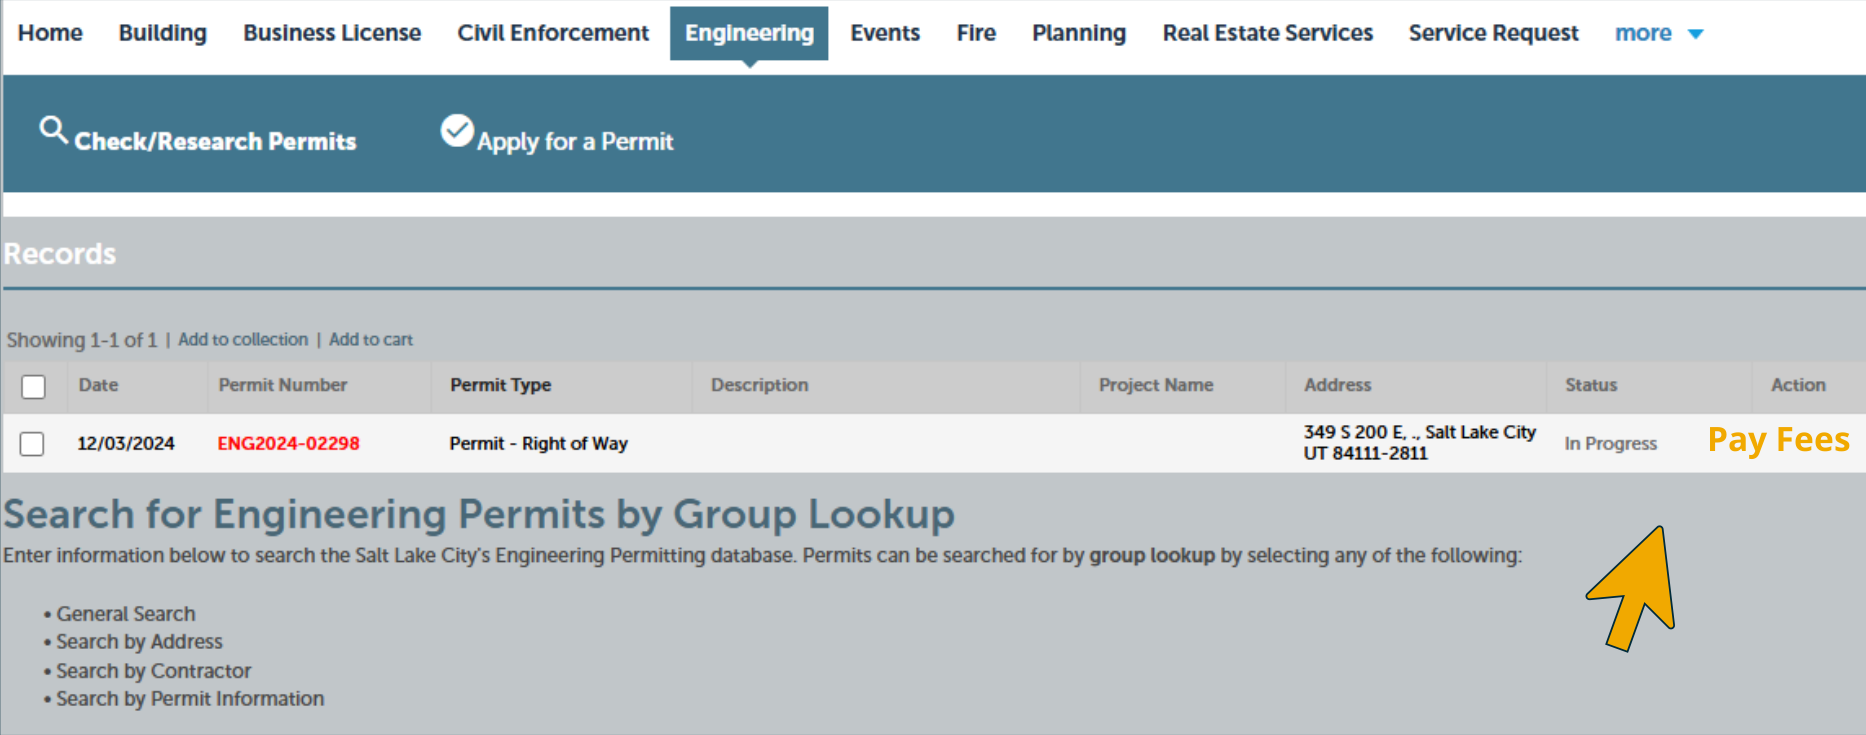
Screenshot of Permit records table displaying permit details with In Progress status and Pay Fees action button highlighted

In the permit records table, the permit status appears in the Status column as “In Progress.” The yellow arrow highlights “Pay Fees” in the Action column at the far right.

Accessible view

The Engineering records screen shows one permit row. Read across the row to the Status column for “In Progress,” then to the Action column for the highlighted “Pay Fees” action.